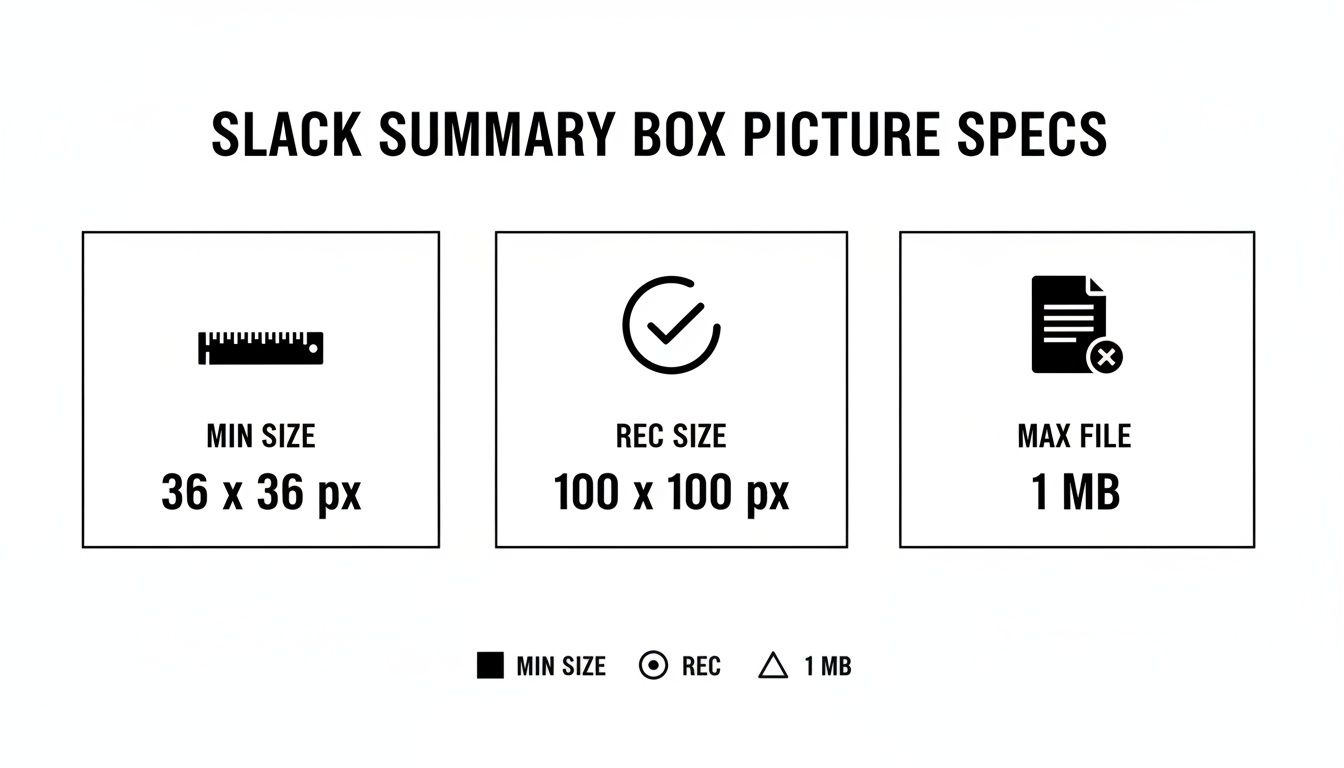
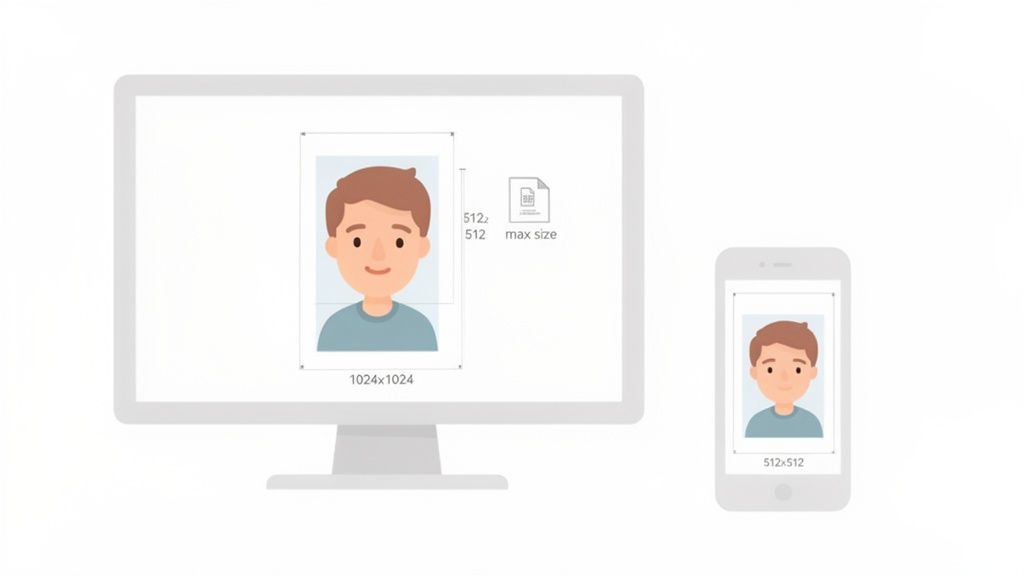
When it comes to your Slack profile picture, the magic number is 1024×1024 pixels. This is the ideal size to aim for.
Sure, Slack will let you upload a smaller image—the absolute minimum is 512×512 pixels—but sticking with the larger recommended size is a smart move. It guarantees your photo looks crisp and professional everywhere, whether your colleagues see it on a giant desktop monitor or glance at it on their phone.
Manage all your social media in one place with Postiz
A good profile picture isn't just about looking nice; it’s about making it easy for your team to spot you in a busy channel or a direct message. Think of it as your digital handshake. Slack has a few simple rules to make sure every image looks great without slowing things down.
Here’s a quick breakdown of what you need to know:
As you can see, you can get away with a 512px image, but doubling that to 1024px is definitely the pro move for the best quality. Slack sets this 1024×1024 pixel recommendation as the upper limit to keep the platform snappy for everyone.
This "bigger is better" approach is pretty standard for professional networks. You'll find similar best practices in our guide on image sizes for LinkedIn posts, where quality also makes a huge difference.
Step-by-Step Guide to Changing Your Slack Picture
Ready for a new look? Swapping out your Slack picture is a quick job whether you're at your desk or on the go. The process is a little different between desktop and mobile, but either way, you’ll have a fresh profile photo in no time. A good, clear image really helps you stand out in a busy channel.
If you’re not familiar with the typical image upload process on modern platforms, it’s worth a quick look. Knowing the basics helps you get your photo sized and ready before you even start.
Here's a look at the profile editing screen in Slack where all the magic happens. It’s designed to be super simple, letting you upload and crop your picture without digging through a bunch of menus.
Changing Your Picture on Desktop (Mac or PC)
The desktop app gives you a bit more precision, especially when it comes to cropping your photo just right.
Open Slack and click your current profile picture in the top-right corner.
Choose Profile from the menu that drops down. This will open your profile in the main sidebar.
Hover your mouse over your picture and click the little pencil icon that shows up.
Click Upload an Image and grab the new photo from your computer.
Slack’s built-in tool will pop up. Use it to crop your image into a perfect square, making sure the best part of your photo is right in the middle.
Hit Save Changes, and you're all set.
Updating on Mobile (iPhone or Android)
Changing your photo on your phone is just as simple and takes only a few seconds.
Launch the Slack app on your device.
Tap on the You tab, which you'll find in the bottom navigation bar.
Tap your profile picture at the very top of the screen.
Select Edit Profile from the menu that appears.
Tap your current photo one more time, then choose Upload Photo to pick an image from your phone’s gallery.
Adjust the crop, tap Save, and you're done.
Following these steps ensures your Slack profile picture size and framing look great, keeping your professional image sharp across all your workspaces.
How to Optimize Your Image for Perfect Quality
Just hitting the minimum slack profile picture size isn't enough if you want your image to look sharp and professional. The real magic happens before you even click upload. A blurry or poorly cropped photo can make a bad first impression, so a little prep work goes a long way.
The golden rule? Always start with a high-quality source image. Your original photo should be significantly larger than Slack’s recommended 1024×1024 pixels. This gives you plenty of room to crop and adjust without losing detail. Trying to make a small image bigger will always result in a pixelated mess.
Prepping Your Image File
Before uploading, do yourself a favor and get your image into a square format. Slack does have a built-in cropping tool, but preparing a 1:1 aspect ratio beforehand puts you in the driver's seat. This way, you can be sure your face or logo is perfectly centered and nothing important gets awkwardly chopped off.
You can use a simple tool like Canva or a more powerful one like Adobe Photoshop to get this done.
Create a Square Canvas: Set up a canvas that's 1024×1024 pixels.
Position Your Image: Drop your high-resolution photo onto the canvas. Resize and move it around until you’ve framed your subject exactly how you want it.
Check the Subject: Remember that Slack will display your picture as a circle. Make sure the most critical part of the image is comfortably in the center to avoid it getting cut off.
Choosing the Right Export Settings
How you save the file matters just as much as how you edit it. You're looking for that sweet spot between great image quality and a small file size, making sure to stay under the 10 MB limit. Keeping your files optimized is a cornerstone of any good digital asset management workflow, as it ensures everything is ready to go for any platform.
When you're ready to export your Slack picture, these settings work best:
Pro Tip: If you're saving a JPG, a quality setting between 75-90% is usually perfect. It dramatically shrinks the file size without any obvious loss in sharpness.
Finally, pick the right file type for the job. For photos of people, JPG is your best bet because it handles complex colors and gradients well. If you’re uploading a logo with sharp lines, text, or a transparent background, PNG is the clear winner. Following these simple steps will ensure you always look crisp and professional in every Slack channel.
Troubleshooting Common Profile Picture Problems
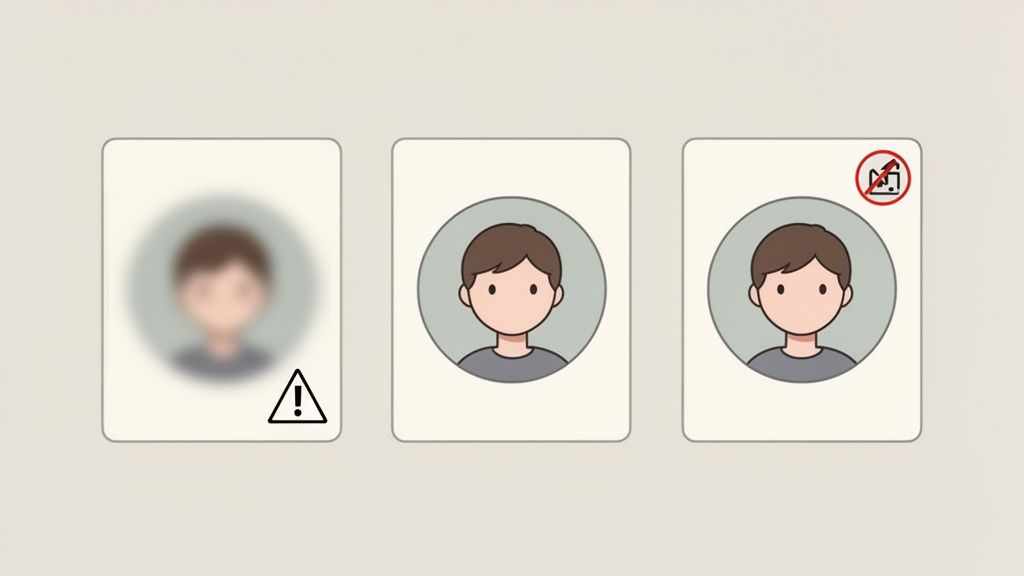
Even if you’ve got the correct slack profile picture size, things can still go sideways. It's a common frustration: a photo looks perfectly sharp on your computer, but the moment you upload it to Slack, it becomes a blurry, pixelated mess. Let's dig into why that happens and how to fix it.
Usually, the problem comes down to image compression or starting with a source file that was just too small. Like most apps, Slack compresses images to keep things running smoothly. While this is great for performance, it can sometimes soften the details in your picture, leaving it looking less than professional.
This isn't just about looks; it can actually affect how people interact. In North America, where 55% of Slack workspaces are based, poor image optimization is a factor in 22% of huddle drop-offs. Why? Because low-quality pictures take too long to render properly. You can find more details on Slack performance statistics on analyzify.com.
Solving Blurriness and Pixelation
The number one cause of a blurry photo is uploading an image that’s smaller than the recommended 1024×1024 pixels. When Slack has to stretch a small image to fill the required space, the quality drops, and it ends up looking fuzzy.
The fix is simple: always start with a high-resolution photo. Even if the final destination is a 1024px square, using an original that’s even bigger gives Slack’s compression algorithm more data to work with. The result is a much sharper, cleaner profile picture.
Key Takeaway: Never try to "upscale" a small image to meet the size requirements. You can’t magically create detail that wasn’t there to begin with, and it will always look blurry. It's much better to start big and scale down.
Fixing Awkward Cropping
Another classic problem is having your head or logo awkwardly cut off. This happens because while you upload and crop your picture as a square, Slack ultimately displays it inside a circle.
To nail the framing every time, just keep a couple of things in mind:
Center your subject: As you crop your image to that perfect 1:1 aspect ratio, make sure the most important part—your face or company logo—is right in the middle.
Leave a buffer zone: Don't crop too tightly. It’s always a good idea to leave a little bit of empty space around the edges. This "safe zone" ensures nothing important gets chopped off when the circular mask is applied.
If you’re running into other issues, like an error message about invalid dimensions, you might want to check out our guide on fixing image dimension errors for some solutions that apply across different platforms.
Understanding Slack's Image Guidelines
Slack’s image rules aren't just there to be difficult; they're designed to keep the platform running smoothly and looking sharp for everyone. Following the recommended slack profile picture size ensures your image is crisp and loads quickly, whether someone's viewing it on a giant monitor or their phone. It's all about finding that perfect balance between quality and performance.
Think of it this way: if your image is too big, Slack has to shrink it down, which often results in a blurry mess. On the flip side, a tiny image will be stretched out, making it look pixelated and unprofessional. The right dimensions are the sweet spot. This principle isn't unique to Slack; you'll find similar logic behind optimal image sizes for web platforms.
File Types and When to Use Them
Slack gives you three main choices for your profile picture format: JPG, PNG, and GIF. Each one has its own strengths, so picking the right one actually matters for how your final image looks.
Here’s a simple guide to choosing the best format:
JPG (Joint Photographic Experts Group): This is your go-to for most headshots and standard photos. JPGs handle color really well and compress images efficiently, keeping file sizes small so they load fast.
PNG (Portable Network Graphics): Perfect for logos, graphics, or any image with sharp text or lines. PNGs are also the only choice if you need a transparent background. They keep details crisp without the fuzzy artifacts you sometimes see in JPGs.
GIF (Graphics Interchange Format): Want a little motion? Use a GIF. These are great for simple, looping animations. Just remember that GIFs are limited to 256 colors, so they aren't the best for complex, colorful photographs.
By getting the size and format right, you can be confident your profile looks professional and clear in every channel and direct message.
Common Questions About Slack Pictures
Getting the Slack profile picture size right is a great start, but a few other questions often pop up. If you've ever wondered about animated pictures, blurry images, or cropping, this is the spot for you.
Think of this as your quick-reference guide for those last-minute tweaks and technical details.
Can I Use an Animated GIF for My Profile Picture?
Yes, you can! Using an animated GIF for your Slack profile picture is a fun way to show off a bit of personality. When a teammate hovers over your picture in the desktop app or checks out your full profile, the animation will play automatically.
Just be aware that in most other places, like the main message view or in notifications, Slack only displays the very first frame of your GIF. So, make sure that first frame looks great as a static image. Your GIF will also need to stick to the same file size and dimension rules as any other picture.
Why Does My Slack Profile Picture Look Blurry?
A blurry profile picture usually comes down to two culprits: either the original image was too small, or it got hit hard by compression. If you upload a picture that's smaller than the recommended 512×512 pixels, Slack has to stretch it out, which leads to that fuzzy, pixelated look.
The fix is to always start with a high-quality photo. An image that's 1024×1024 pixels is ideal. When you save it, export it as a high-quality JPG (set to 80-90% quality) or use the PNG format. This gives Slack's compression algorithm more data to work with, keeping your final picture sharp.
Important Reminder: Don't just resize a small image to make it bigger. You can't magically create detail that isn't there, and the result will always look soft and blurry. It's always better to start with a large, crisp photo and scale it down.
How Does Slack Crop Rectangular Images?
When you upload a rectangular photo, Slack will ask you to crop it into a square before you can save it. You'll see a simple cropping tool with a selection box that you can move and resize to frame the perfect shot.
Since the final picture is always shown as a circle, make sure your subject is centered in the square you select. Anything in the corners of that square will get chopped off. A good practice is to leave a little bit of breathing room around your face or logo so nothing important gets trimmed away.
What Is the Difference Between a Profile Picture and a Workspace Icon?
It's easy to get these two confused, but they have very different jobs in Slack.
Profile Picture: This is your personal avatar. It shows up next to your name in every message, channel, and huddle you're in, across all of your workspaces.
Workspace Icon: This is the logo for the entire team or company. It's the icon you see in the sidebar on the left that represents that specific workspace. Everyone in the workspace sees the same icon.
So, while the technical specs are similar, your profile picture identifies you, while the workspace icon brands the space.
Ready to put these tips into action and create stunning visuals for all your social platforms? With Postiz, you can design, schedule, and analyze your social media content all in one place. Our built-in design tools and AI assistants make it easy to craft professional posts that capture attention. Start creating with Postiz today
Stuck at 0 views? Find out why is my TikTok not getting views with our guide. We diagnose algorithm flags, technical glitches, and show you how to fix them.