


Of course you can post on Instagram from your desktop! It might feel like a mobile-only world, but Instagram has opened up several ways for creators and social media managers to handle everything right from their computer. For anyone managing a serious content workflow, this change is a huge relief.
Can You Post on Instagram from Desktop? Easy Ways to Do It

Manage all your social media in one place with Postiz
+7 more
Why Bother Posting from a Desktop?
For a long time, the only way to post was from your phone. This meant anyone editing high-res photos or crafting detailed captions on a computer had to go through a clumsy process of sending files to their phone just to get them published. It was a real pain.
Thankfully, those days are over. Moving your Instagram workflow to a desktop just makes everything more efficient and organized. It's a total game-changer, especially if you're juggling multiple accounts or scheduling posts ahead of time.
Here’s where you’ll really feel the difference:
- Uploading is a breeze. You can move high-quality photos and videos straight from your editing software to Instagram. No more emailing files to yourself.
- Writing captions is faster. Let's be honest, typing out thoughtful captions and researching hashtags is way easier with a real keyboard.
- Managing content is simpler. You can organize your media files, plan your grid layout, and schedule your entire week’s worth of content from one central hub.
The Best Ways to Post from Your Computer
It's true that Instagram is still a mobile-first platform. As of early 2025, a tiny 4.2% of total Instagram usage happens on a desktop, which really shows how much the mobile app dominates. Still, since an official update in 2021, posting from your computer has become a native feature. If you're curious about user trends like this, SQ Magazine has some interesting stats.
You have three solid options for posting from your desktop, and each one fits a different need.

Desktop Instagram Posting Methods at a Glance
So, which tool is right for you? This table breaks down the three main methods to help you decide at a glance.
| Method | Best For | Key Features |
|---|---|---|
| Instagram Website | Quick, single posts without extra tools. | Direct uploads for photos/videos, basic editing, and in-the-moment posting. |
| Meta Business Suite | Scheduling content for Instagram & Facebook. | Post scheduling, performance analytics, and managing DMs/comments in one place. |
| Third-Party Tools (like Postiz) | Agencies, marketers, and serious creators. | Advanced scheduling, bulk uploads, AI assistance, and full-scale content automation. |
Each option has its place, and the best one really depends on how you manage your social media.
Ultimately, you can go with:
- The Instagram Website: This is the most straightforward route for simple, one-off posts.
- Meta Business Suite: A fantastic free tool from Meta for scheduling posts and digging into performance metrics.
- Third-Party Tools: Platforms like Postiz offer powerful features that help you automate social media posting, manage several accounts at once, and really dial in your content calendar.
Let's walk through how to use each of these methods, step-by-step, so you can figure out which one fits your workflow best.
Posting Directly Through the Instagram Website
The simplest answer to the old question "can you post on Instagram from a desktop?" is finally yes—right on Instagram's own website. For a long time, this was a huge pain point for users, but thankfully, Instagram added a built-in feature for posting from your computer. It’s perfect for quick, straightforward uploads without needing any extra software.
I find myself using this method when I just want to get a photo or video live without any fuss. For example, if you’re a photographer who just finished editing a batch of high-res images, you can skip the awkward step of transferring them to your phone. Uploading straight from your desktop not only saves time but also helps preserve the original image quality.
How to Post from the Instagram Website
The process itself is really intuitive and feels a lot like using the mobile app.
First, log in to your account over at Instagram.com. You'll see a navigation menu on the left side of the screen. Just look for the “+” icon labeled “Create”—that’s where all the magic happens.
Clicking that button pops up a window. From there, you can either drag and drop your photos and videos or click to select them from your computer’s files. You're not just limited to a single image, either; you can upload multiple files to create a carousel post.
Once your media is loaded, Instagram guides you through a few familiar steps:
- Cropping and Aspect Ratio: You can pick from the original size, 1:1 (square), 4:5 (portrait), or 16:9 (widescreen). This helps you make sure your post looks exactly how you envisioned it in the feed.
- Filters and Adjustments: Just like on your phone, you get access to all the classic Instagram filters. Or, if you prefer, you can manually tweak settings like brightness, contrast, and saturation.
- Final Touches: The last screen is where you pull it all together. Here’s where you’ll write your caption, tag a location, mention other accounts, and fill in alt text for better accessibility.
After you've got everything looking just right, hit the “Share” button. Your post will go live on your profile immediately.
Understanding the Limitations
While posting directly from the website is incredibly convenient, it’s important to know what it can’t do. This method is really built for in-the-moment publishing. It lacks the more powerful features you’d need for a serious content strategy.
Key Takeaway: The native website uploader is fantastic for direct, immediate posts. However, it offers zero scheduling capabilities, which means you can’t plan your content ahead of time.
Here's a quick rundown of what you'll be missing:
- No Scheduling: You can't set a post to go live at a future date and time. It’s publish-now or nothing.
- No Stories or Reels Creation: The “Create” button is strictly for feed posts—photos, carousels, and videos. You won't be able to upload Instagram Stories or build complex Reels here.
- Basic Analytics: You won't find any of the deep performance insights that you get with professional business tools.
So, who is this for? It’s ideal for a solo creator sharing a spontaneous thought or a small business owner who needs to post a new product photo right away. But for anyone managing a content calendar or running a full-blown marketing campaign, the lack of scheduling is a significant roadblock. That’s when you need to look at tools like Meta Business Suite or other third-party schedulers.
Using Meta Business Suite for Scheduling and Analytics
When you're ready to get serious about your Instagram strategy, you'll want to move beyond posting one-offs from your phone. This is where Meta Business Suite comes in. It’s basically the command center for your Instagram and Facebook accounts, giving you some incredibly powerful scheduling and analytics tools, all for free.
If you’re trying to build a consistent content calendar, this is your answer. It takes the question "can you post on Instagram from desktop?" and replies with a feature-packed "absolutely."
For example, let's say you run a small beauty salon. Instead of having to remember to post a "book now" reminder every Friday morning, you can sit down on Monday, schedule the entire week's worth of content, and be done with it. That kind of planning is what makes an account look professional, not just like a hobby.

Getting Started with Business Suite
First things first, you need to get your accounts connected. Business Suite requires an Instagram Business or Creator account that's linked to a Facebook Page. If you haven't done that yet, it’s a quick change in your Instagram settings and it unlocks a ton of useful professional features.
Once they're linked, just head over to the Meta Business Suite dashboard. You'll immediately notice how it pulls everything—notifications, messages, and content planning—into one clean interface.
Here’s what you get right away:
- Unified Inbox: You can manage all your Facebook and Instagram DMs and comments from one spot. No more app-switching.
- Content Calendar: This gives you a bird's-eye view of everything you've scheduled and published on both platforms.
- Planner Tool: This is where the magic happens. Create, edit, and schedule posts, Stories, and even Reels right from your computer.
Having everything in one place is a huge time-saver. It lets you manage your community engagement and your content strategy side-by-side. To make the most of these tools, it's a good idea to pair them with comprehensive social media marketing strategies.
Scheduling Your First Post
Once you're in, creating and scheduling content is a breeze. Look for the big "Create post" button, which will open up a composer window. From there, you can upload your photo or video, write your caption, and throw in your hashtags, just like you would on your phone.
The real game-changer is the scheduling option. Instead of just a "Publish" button, you’ll find a dropdown menu where you can pick the exact date and time you want your post to go live. The platform even gives you suggestions for optimal posting times based on when your audience is most active.
Pro Tip: Spend some time in the "Planner" view. It’s perfect for spotting gaps in your content schedule. Keeping a consistent posting rhythm signals to the Instagram algorithm that your account is active, which can seriously help your reach.
Beyond Scheduling: Unlocking Analytics
The true power of Meta Business Suite, though, is in its analytics. Posting is only half the job—understanding what actually resonates with your audience is how you grow. The "Insights" tab is where you'll find a deep dive into your account’s performance.
You can track all the important metrics, including:
- Reach and Impressions: See how many unique people saw your posts and the total number of times they were viewed.
- Audience Demographics: Get to know your followers—their age, gender, and location—so you can create content they'll love.
- Content Performance: Easily identify which posts got the most likes, comments, and shares.
This data is pure gold. For example, you might discover that your video posts get 50% more shares than your static images. That’s a massive clue telling you exactly what to create next. By checking these metrics regularly, you can make decisions based on real data instead of just guessing. If you want to go even deeper, our guide to social media analytics and reporting has more advanced tips.
Even with all these amazing desktop tools, it's important to remember that Instagram is still a mobile-first world. The platform has grown to over 2 billion monthly active users, but only 4.2% of total usage happens on a desktop. This just goes to show that while desktop management is a must for creators and businesses, the average user is still scrolling on their phone.
Gaining Full Control With Third-Party Tools
While posting directly from Instagram's website or the Meta Business Suite works in a pinch, they just don't cut it for serious social media managers, agencies, or brands juggling a heavy content calendar. If your daily grind involves multiple accounts, team collaboration, or a sophisticated scheduling strategy, you'll quickly hit a wall. That's where third-party tools come in—they're specifically built to solve these exact problems.
Think about a marketing agency with five different clients. Hopping between accounts, logging in and out all day to post content is a massive time sink and practically begs for mistakes. A dedicated platform brings all those accounts under one roof, creating a single, organized dashboard to manage everything. It's a game-changer.
Going Way Beyond Basic Scheduling
Third-party management platforms do so much more than just let you schedule a few feed posts. They unlock powerful features that you simply won’t find in Meta’s own tools, giving you what you need to execute a truly comprehensive content strategy.
- Schedule Anything, Seriously: These tools excel at scheduling Reels and Stories, often with advanced options that native platforms lack.
- Smarter Hashtag Strategy: You can get detailed analytics on how your hashtags perform, discover new ones that are trending, and save your go-to sets for quick use.
- Seamless Teamwork: Features like approval workflows are a lifesaver. Team members can draft and submit posts for a manager to review before they go live, which is perfect for maintaining brand consistency.
- Client-Ready Reporting: Forget wrestling with spreadsheets. You can generate in-depth reports that pull data from all your social profiles into a single, professional-looking document.
This visual really highlights the difference between posting manually and using a scheduling tool.
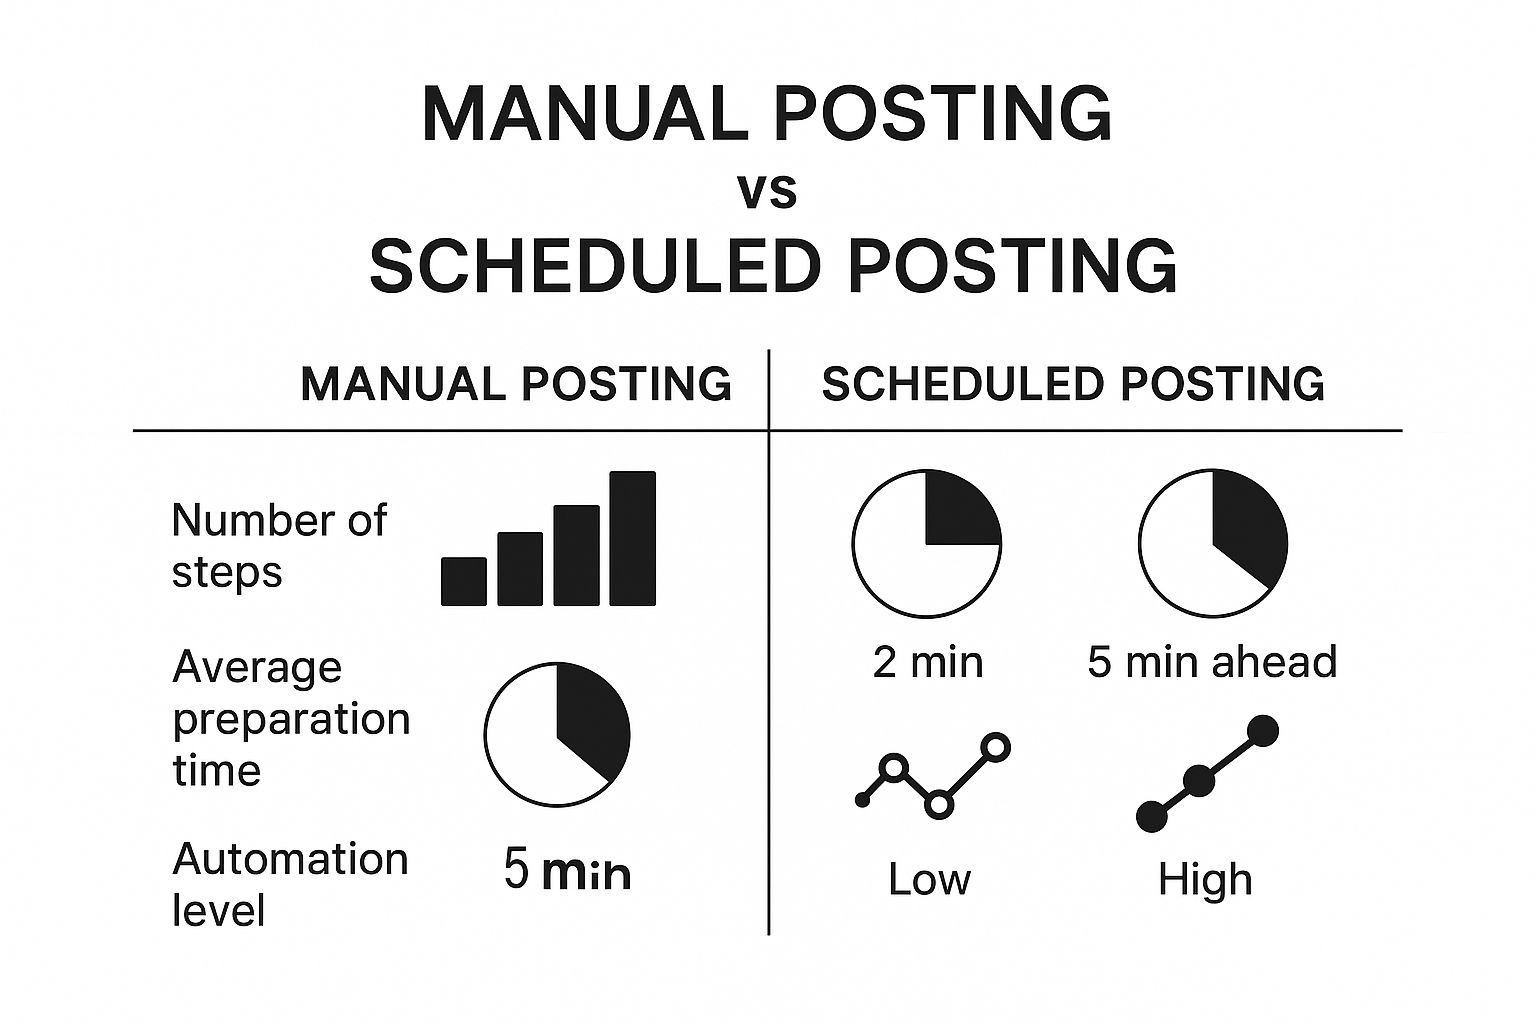
As you can see, while scheduling takes a bit more planning upfront, it automates the entire process and frees up a ton of your time down the line.
To help you decide which method is right for you, let's compare the features side-by-side.
Feature Comparison: Native vs. Meta Suite vs. Third-Party Tools
| Feature | Instagram Website | Meta Business Suite | Third-Party Tools |
|---|---|---|---|
| Post Types | Feed, Reels | Feed, Stories, Reels | All (Feed, Stories, Reels, Carousels) |
| Multi-Account Mgt. | No (manual switch) | Yes | Yes (often unlimited) |
| Advanced Scheduling | No | Yes (basic) | Yes (bulk, recurring, optimal times) |
| Team Collaboration | No | Limited | Yes (workflows, user roles) |
| Hashtag Analytics | No | No | Yes (tracking, suggestions) |
| In-Depth Reporting | Basic Insights | Basic Analytics | Yes (custom, cross-platform reports) |
| First Comment | No | No | Yes (auto-post first comment) |
The table makes it pretty clear: while the free options are functional, third-party tools offer a far more powerful and complete solution for anyone serious about managing their Instagram presence.
Choosing the Right Platform Safely
When you decide to post on Instagram from your desktop with an outside tool, your account's security should be your top priority. Not all schedulers are built the same, and using an unauthorized app can get your account flagged or even shut down.
This is non-negotiable: Only use a tool that is an official Meta Business Partner. This seal of approval means the platform uses Instagram’s official API, keeping your login details safe and ensuring all your activity is compliant with Instagram's rules.
It might be tempting to try a non-partner tool, but the risk just isn't worth it. These apps often rely on sketchy, unstable workarounds that break every time Instagram pushes an update, leaving your scheduled posts in limbo. Sticking with an official partner gives you reliability and, more importantly, peace of mind.
Of course, these advanced platforms usually come with a subscription fee. Pricing often depends on how many accounts you need to connect and which features you want. The good news is there are plenty of great, affordable options out there. We've gathered some of the best in our guide to free social media scheduling tools to help you find one that fits your budget.
For any serious marketer, the investment in a quality third-party tool pays for itself almost immediately in saved time, a smoother workflow, and much deeper insights into what's actually working. It truly turns your desktop into a social media command center.
Troubleshooting Common Desktop Posting Problems
So you’ve got the hang of posting to Instagram from your computer, but now you’re hitting a wall. A video won’t upload, a button is missing—it happens. When a glitch pops up right as you're trying to post, it can completely derail your workflow.
The good news is that most of these issues are pretty common and surprisingly easy to fix. It's rarely a major problem with Instagram itself; more often than not, it's a simple browser hiccup or a permissions setting that needs a quick refresh. Let's walk through the usual suspects and get you back on track.
Your Video Upload Fails or Gets Stuck
This is probably the most frequent headache. You’ve spent ages editing the perfect video, you hit upload, and… crickets. It either fails right away or hangs in processing purgatory forever.
Before you try uploading it again (and again), take a second to check the file's specs. Instagram is a bit particular about video.
- File Format: Make sure your video is an MP4 or MOV. Instagram doesn't play well with other formats like AVI or WMV, so you'll need to convert it.
- Length: For the main feed, videos need to be between 3 seconds and 60 minutes. For Reels, you're capped at 90 seconds.
- File Size: Keep it under 4 GB. Anything larger is just asking for a timeout or failure, especially on a spotty connection.
Usually, a quick export in the right format from your editing software does the trick. If the specs are correct, your internet connection is the next thing to check. A weak Wi-Fi signal is a classic culprit for failed uploads.
The "Create" Button Has Vanished
Ever log into Instagram on your desktop, ready to post, only to find the "+" create button is just… gone? It’s a baffling problem, but the fix is almost always related to your browser, not your account.
Quick Fix: The first thing to try is a simple cache and cookie cleanup. Your browser holds onto old data that can sometimes mess with how modern websites load, causing interactive elements like buttons to disappear.
After you've cleared the cache, fully close and restart your browser before logging back in. If the button is still missing, try disabling your browser extensions one by one. Ad blockers or privacy tools can sometimes be a little too aggressive and interfere with Instagram's interface. As a last resort, just try a different browser—if it works in Chrome but not Safari, you've found the source of the problem.
A Scheduled Post Never Went Live
There's nothing more frustrating than carefully scheduling a post in Meta Business Suite and then discovering hours later that it never actually published. This almost always signals an authentication problem between Instagram and Meta's tools.
The connection simply needs a refresh. Head into your Business Suite settings, find your connected accounts, and completely disconnect your Instagram profile. Then, immediately reconnect it. This forces a new handshake between the platforms and updates any expired permissions.
Also, take a moment to confirm your Instagram account is set up as a Business or Creator profile. Personal accounts can't be scheduled through Business Suite, which is a detail that trips a lot of people up.
Got Questions About Desktop Posting? We've Got Answers.
Even after walking through all the different ways to post to Instagram from your computer, you might still have a few things you're wondering about. Let's tackle some of the most common questions that pop up.
Can I Post Instagram Stories From My Desktop?
Yes, you absolutely can, but not directly through the Instagram website. The uploader you see on Instagram.com is only built for regular feed posts and videos.
If you want to post or schedule Instagram Stories from your computer, you’ll need a dedicated tool. Your best bet is to use something like Meta Business Suite, which is Meta's own platform, or another third-party management app designed for this.
Is It Safe to Use a Third-Party App to Post?
It is, but only if you choose a reputable one. The key is to look for apps that are official Meta Business Partners. This seal of approval means the tool uses Instagram's official API, so your account stays secure and you're not breaking any of Instagram's rules.
Be wary of any service that isn't a partner, as they might be using sketchy workarounds that could get your account flagged or even banned.
Here’s a simple rule of thumb: If an app asks you to type your Instagram password directly into its own website instead of sending you to the official Instagram or Facebook login page, walk away. Legitimate tools will always use a secure, official authentication process.
Does Posting From a Computer Lower the Quality?
Quite the opposite—it usually helps you maintain better quality.
Think about it: when you move a high-resolution photo or video from your computer to your phone, it often gets compressed along the way, making it look a little less crisp. Uploading directly from the source file on your desktop bypasses that compression, so what you see on your screen is exactly what your audience gets. This is a huge reason why professional photographers and videographers almost always post from their computers.
What's the Best Free Way to Schedule Posts?
For a free solution that's both powerful and reliable, you can't go wrong with Meta Business Suite.
Since it’s Meta’s official platform, you know it's secure and fully integrated. It lets you schedule everything—feed posts, Stories, and Reels—for both Instagram and Facebook. You also get access to some pretty decent analytics to see how your content is doing. If you're looking to plan out your posts without spending any money, it's the perfect place to start.
Ready to take your social media management to the next level? Postiz offers advanced scheduling, AI content creation, and powerful analytics to streamline your entire workflow. Start scheduling smarter today

Founder of Postiz, on a mission to increase revenue for ambitious entrepreneurs
Do you want to grow your social media faster?

Do You Want to Grow Your Social Media Faster?
Thousands of creators and businesses use Postiz to 10x their social media reach. Stop spending hours — automate and grow.
🚀Schedule to all platforms at once
🤖Let AI write your posts for you
📈Watch your engagement skyrocket
💸Completely free to start
Related Posts

A breakdown of the Claude Code + Claude Skills workflow that replaces a social media team — and how to close the loop with a publishing layer that actually ships posts.

Explore the top 10 Sendible alternatives with better features for effective social media management and scheduling

Tired of marketing chaos? Discover how marketing workflow management software streamlines tasks, boosts team productivity, and delivers measurable results.
Ready to get started?
Grow your social media presence with Postiz.
Schedule, analyze, and engage with your audience.

Open-source social media scheduling tool