


When it comes to vertical video, the gold standard for most platforms is a 9:16 aspect ratio, with a resolution of 1080×1920 pixels. This is the sweet spot for creating that immersive, full-screen experience people expect on their phones. Think of this guide as your go-to reference for all the major players.
A Creator’s Guide to Vertical Video Dimensions

Manage all your social media in one place with Postiz
+7 more
Your Quick Reference for Vertical Video Dimensions
Trying to keep up with the exact video specs for every social media app can feel like a full-time job. Each platform has its own nuances, and getting them wrong means your hard work might end up looking cropped, blurry, or just plain weird.
This section is designed to be your cheat sheet. Before you even think about hitting 'export,' you can quickly check here to make sure your dimensions are spot on. It's a simple step that saves a ton of headaches later. After all, the data doesn't lie—vertical is the way people watch today.
Just look at the numbers. With 75% of all mobile video views happening vertically, formatting your content correctly isn't just a suggestion anymore; it's essential for getting noticed.
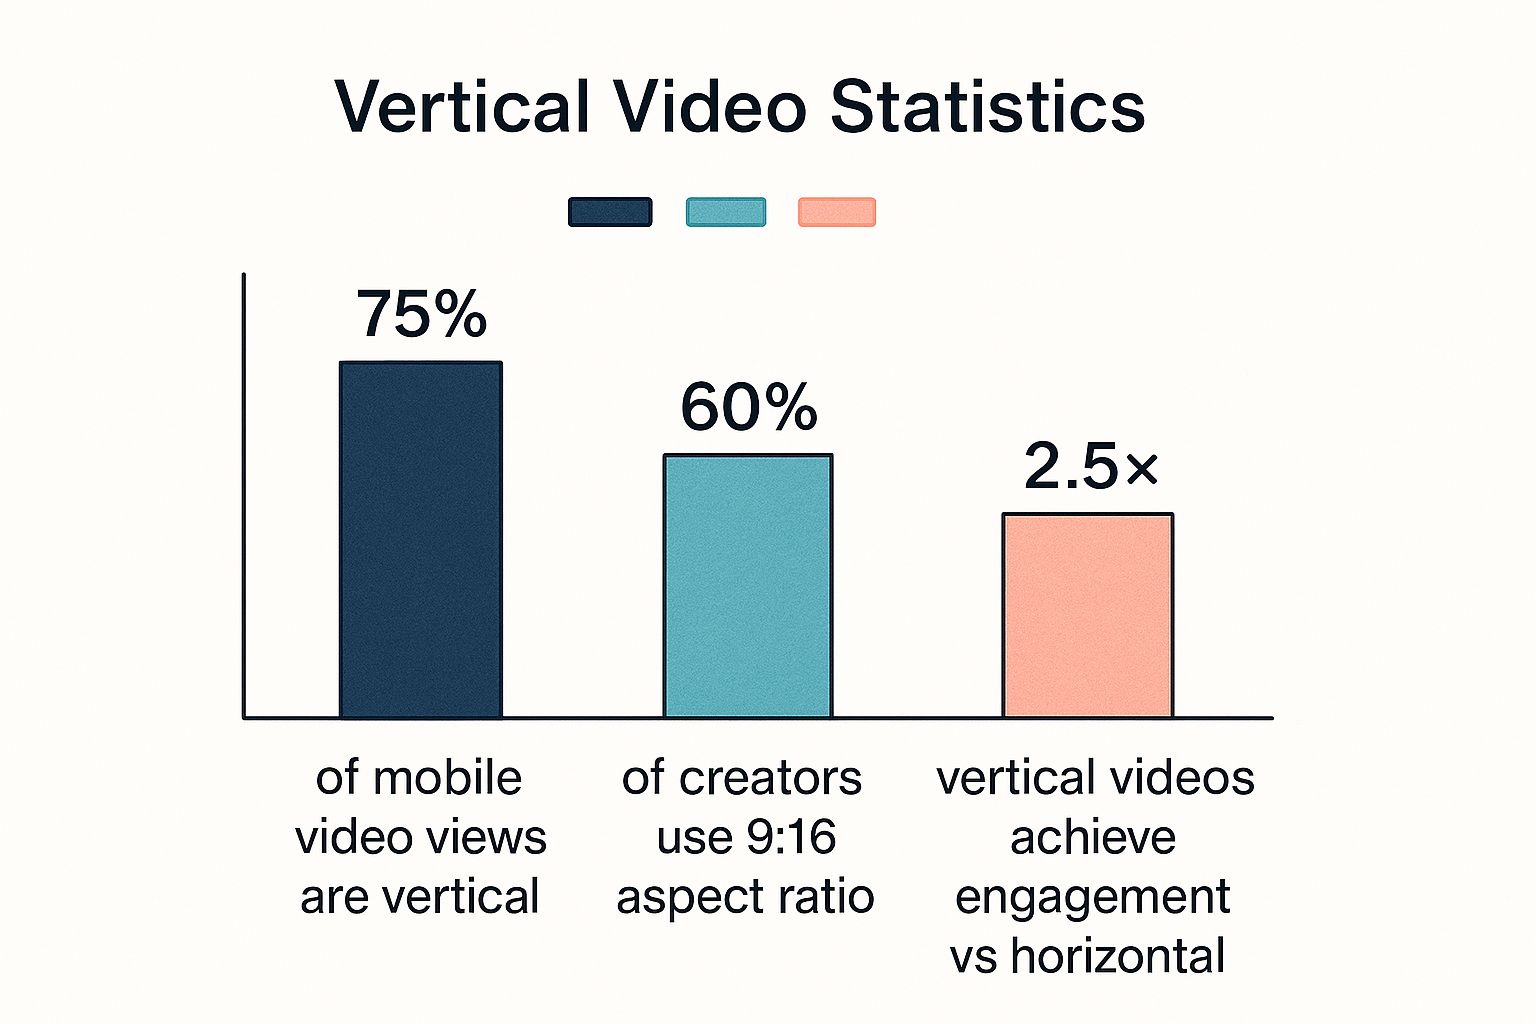
As the data shows, it’s not just about viewership. Creators who embrace the vertical format see a massive payoff, with their videos getting 2.5 times more engagement. This is all about meeting your audience where they are and giving them content in the format they prefer.
Vertical Video Specifications Cheat Sheet by Platform
To make things even easier, I've put together a summary table with the key specs for today's biggest platforms. Use this chart for a last-minute check before you upload to make sure everything from resolution to file size is good to go.
| Platform | Recommended Resolution (Pixels) | Aspect Ratio | Max File Size / Length |
|---|---|---|---|
| TikTok | 1080×1920 | 9:16 | 287 MB (iOS) / 72 MB (Android) / Up to 10 min |
| Instagram Reels | 1080×1920 | 9:16 | 4 GB / Up to 90 sec |
| Instagram Stories | 1080×1920 | 9:16 | 4 GB / Up to 60 sec per story card |
| YouTube Shorts | 1080×1920 | 9:16 | No official size limit / Up to 60 sec |
| Facebook Reels | 1080×1920 | 9:16 | 4 GB / Up to 90 sec |
This table is your starting point. As we dive into the specifics for each platform in the sections that follow, you'll get a deeper understanding of not just the what, but the why behind these recommendations.
Getting Started with Vertical Video: The Core Concepts
Before we get into the nitty-gritty of each platform's specs, let's cover the fundamentals. Getting these basics right is the key to making sure your videos look great everywhere, not just technically correct. Think of this as the foundation for creating professional-looking content that people actually want to watch.
Two terms you’ll hear constantly are aspect ratio and resolution. People often mix them up, but they mean very different things. Nailing the difference is your first step to producing top-notch vertical video.
Aspect Ratio vs. Resolution
Here’s a simple way to think about it: aspect ratio is the shape of your video. For vertical video, that magic number is 9:16. This just means the video frame is 9 units wide for every 16 units high, creating that tall, skinny rectangle we all know from scrolling on our phones.
Resolution, on the other hand, is all about the video's clarity and detail. It's measured in pixels, and the gold standard for full HD vertical video is 1080×1920 pixels. That's 1080 pixels across and 1920 pixels down. The more pixels you have, the sharper and cleaner your video will look.
- Aspect Ratio (The Shape): 9:16 is the go-to for TikTok, Instagram Reels, and YouTube Shorts.
- Resolution (The Clarity): 1080×1920 pixels makes sure your 9:16 video looks crisp and professional, not blurry.
Why You Can't Ignore Safe Zones
Ever watched a video where the text was cut off by the "Like" button? That's what happens when you ignore the safe zone. A safe zone is simply the area of your screen where you can place important visuals and text without them being covered up by the app's interface.
Each app overlays its own buttons, your username, the video caption, and other icons right on top of your content. Placing a crucial call-to-action or a product name outside this central safe area is a huge rookie mistake. If people can't see your message because it's hidden behind the user interface, you've lost them.
Failing to account for these zones makes your content look unprofessional and, frankly, hard to watch. Always keep your main subject, text, and any critical graphics squarely in the center of the frame to ensure everyone sees them, every time.
TikTok Video Dimensions and Safe Zones: A Creator's Guide

As the undisputed king of short-form video, TikTok has its own set of rules that can make or break your content. If you're serious about getting noticed, mastering the platform's video dimensions isn't just a suggestion—it's essential.
The magic formula is pretty straightforward: stick to a 9:16 aspect ratio. This ensures your video takes up the entire mobile screen, giving viewers that seamless, "For You Page" experience they crave. Veer from this, and you’ll end up with ugly black bars that scream "amateur."
TikTok's Technical Specifications
To make sure your videos look sharp and professional, you'll want to export them at the highest quality TikTok allows. Following these technical specs helps avoid weird compression artifacts and guarantees your content looks great on any phone.
Before you hit export, lock in these settings:
- Recommended Resolution: 1080×1920 pixels. This is the gold standard for full HD vertical video and the perfect resolution for TikTok.
- File Formats: Your best bets are MP4 or MOV. They are the most common formats and upload without a hitch.
- File Size: Keep your video under 287 MB on iOS and 72 MB on Android. Anything bigger might fail to upload or just take forever.
And while TikTok lets you upload videos up to 10 minutes long now, remember the platform was built for brevity. The most successful content is still short and sweet, usually under a minute, so keep it snappy for the best results.
Navigating TikTok Safe Zones
Honestly, the biggest mistake I see new creators make is forgetting about the TikTok interface. All those buttons, your caption, and your profile info are layered on top of your video. If something important gets covered up, your message is completely lost.
Pro Tip: Think of the center of your screen as your canvas. Always keep your crucial text, logos, or any key action within this central safe zone. Just assume the top, bottom, and right edges will be covered by the UI.
To put it simply, imagine a buffer around your video. The bottom 15-20% is where you'll find the caption, username, and sound details. The right side is home to the like, comment, share, and profile icons. Stick a call-to-action in either of those spots, and you can guarantee no one will see it.
For example, say you're filming a "get ready with me" video and you place the product names at the very bottom of the screen. On TikTok, the caption will completely hide them. The smarter move is to position that text closer to the middle, making sure it’s always in view. As you get more advanced, learning how to collaborate on TikTok will also teach you a lot about creating content that works in these shared visual spaces.
Getting Your Video Specs Right for Instagram Reels and Stories
Instagram is a major player in the vertical video game, but getting your content seen and appreciated means knowing the difference between Reels and Stories. On the surface, they seem pretty similar. Both are designed for a 9:16 aspect ratio and look best at a 1080×1920 pixel resolution. But that's where the similarities end.
The real trick is understanding how the user interface and time limits for each format change the game. Reels are your permanent, discoverable content, while Stories are fleeting, 24-hour snapshots. Nailing the technical details for each is what separates polished content from amateur mistakes.
Technical Requirements for Reels and Stories
To keep your videos looking sharp and avoid any weird cropping or fuzzy compression from Instagram, stick to these specs. It's a simple step that makes a huge difference in quality.
Instagram Reels:
- Aspect Ratio: 9:16
- Resolution: 1080×1920 pixels
- Video Length: Up to 90 seconds
- File Format: MP4 or MOV
- Max File Size: 4 GB
Instagram Stories:
- Aspect Ratio: 9:16
- Resolution: 1080×1920 pixels
- Video Length: Up to 60 seconds per Story card
- File Format: MP4 or MOV
- Max File Size: 4 GB
Notice the core specs are identical? The real catch is the safe zone. The spots where Instagram places your username, caption, and like buttons are completely different in Reels versus Stories. This is a critical detail because it dictates where you can safely put your own text, stickers, or important visuals.
How to Repurpose Content Between Reels and Stories
You can definitely use the same video for both a Reel and a Story, but you have to be smart about it. A classic mistake is creating a Story with a poll sticker right at the bottom, only to have it completely covered by the caption overlay when you share it as a Reel.
The golden rule? Keep your most important stuff—text, logos, faces—smack in the middle of the screen. This central area is your safe zone for both formats, guaranteeing nothing crucial gets hidden.
For instance, say you're filming a product demo for a Reel. Make sure the product name and your call-to-action are in the middle third of the frame. That way, when you pop it over to your Story, the "Send message" box won't block anything important. To really make sure your vertical videos look their best, it's worth knowing how to upload a video to Instagram effectively.
At the end of the day, getting a handle on these specs makes your content work harder for you and simplifies your creation process. Consistently putting out well-formatted videos is a straightforward, yet powerful, way to build your audience. If that's your goal, our guide on how to grow your Instagram followers has even more strategies you can use.
A Guide to YouTube Shorts Video Requirements

YouTube Shorts is the platform's big play in the short-form video game, and it's become a massive driver of channel growth. To get your content seen by its huge audience, you need to make sure your video is formatted in a way that signals to YouTube's algorithm, "Hey, this is a Short!"
The main rule is pretty straightforward: your video needs to be vertical. If you want that full-screen, immersive look that viewers have come to expect, you absolutely have to use the standard 9:16 aspect ratio. This is what makes your content fill up the entire screen on a phone, which is precisely how people watch videos in the Shorts feed.
Core Technical Specs for Shorts
Getting your video categorized as a Short and making it look sharp is all about hitting a few key technical marks. Stick to these, and you'll be set up for success with both the algorithm and your viewers.
- Resolution: Your go-to resolution should be 1080×1920 pixels. This is the standard for full HD vertical video, and it ensures your content looks crisp and professional.
- Aspect Ratio: While a square (1:1) video can technically be recognized as a Short, 9:16 is what you should always aim for. It gives you the most screen real estate and the best viewing experience.
- Video Length: Keep it short and sweet. Your video has to be 60 seconds or less. If it runs a second longer, YouTube will just treat it as a regular video upload, not a Short.
When YouTube rolled out Shorts back in 2021, it was a clear move to compete with platforms like TikTok and lean into the mobile-first content trend. The strict 60-second time limit and 9:16 aspect ratio were specifically designed for the quick, scrollable, and highly engaging way people consume content now. It’s a complete shift from YouTube's traditional widescreen format and really shows how critical vertical video is for connecting with viewers today.
Quality and File Formats
It’s not enough to just get the dimensions right. You also have to think about quality, because nobody sticks around for a blurry or pixelated video. Learning how to improve video quality on YouTube is a huge part of making Shorts that people will actually watch. For the best results, always export your videos in a high-quality format like MP4 or MOV.
These specs are perfect for YouTube, but remember that every platform plays by its own rules. If you're creating videos for professional audiences on other sites, for example, you'll want to check out our guide on https://postiz.com/blog/linkedin-post-dimensions to make sure you're formatting everything correctly there, too.
Your Go-To Export Settings for Vertical Video
https://www.youtube.com/embed/M2TsuDpvKbs
Creating a fantastic video is one thing, but making sure everyone sees it exactly as you intended? That all comes down to your export settings. Getting these wrong can ruin hours of hard work, leading to frustrating issues like pixelation, weird colors, or other compression problems that just look unprofessional.
Think of these technical details as the final polish. Once you get a solid export routine down, you can be confident your vertical videos will look sharp and clean on every platform, every time.
The Essential Export Checklist
It doesn't matter if you're working in a powerhouse editor like Adobe Premiere Pro or a mobile-first app like CapCut. The fundamental rules for a high-quality export are the same across the board. Before you hit that render button, quickly run through this checklist.
This simple check helps you strike the perfect balance between file size and visual quality, giving you a final video that both social media algorithms and your audience will love.
- Format (Codec): Stick with H.264. It's the gold standard for web video for a reason, offering the best mix of high quality and manageable file size. Pretty much every platform, from TikTok to YouTube Shorts, is built to handle it perfectly.
- Resolution: Always match your project resolution. If you edited your video at 1080×1920 pixels, export it at the exact same size. This prevents any weird stretching or cropping that can seriously mess with your video's clarity.
- Frame Rate: Your best bets are 30 FPS or 60 FPS. For most content, 30 frames per second is standard and looks great. If your video has a lot of fast movement or you want that ultra-smooth look, bump it up to 60 FPS.
Why Bitrate is the Secret to Quality
Bitrate might sound technical, but it’s one of the most important settings you'll touch. It directly controls how much data is used to store your video’s information per second—in short, higher bitrate means better quality and a bigger file. For social media, you don't need to go overboard.
A classic mistake is setting the bitrate too low, which gives you that blocky, overly-compressed look. On the flip side, setting it way too high just bloats your file size with no real visual benefit, especially on a phone screen.
For a standard 1080p vertical video, a target bitrate between 10–15 Mbps (megabits per second) is the sweet spot. This range delivers crisp, clean visuals without creating a massive file that takes forever to upload. It’s the perfect setting to ensure your video looks fantastic on any mobile device.
Answering Your Top Vertical Video Questions
Even with all the specs laid out, you're bound to have questions. It happens to everyone. Getting the details right can feel a bit tricky at first, but a few key distinctions make all the difference.
Let's clear up some of the most common points of confusion so you can create with confidence.
What's the Difference Between 9:16 and 1080×1920?
This is a great question, and it's simpler than it sounds. Think of it like a photo frame versus the photo inside it.
- 9:16 is the aspect ratio—it’s just the shape of the video. It means the frame is 9 units wide for every 16 units tall, giving you that classic, full-screen vertical look.
- 1080×1920 is the resolution—this is the quality or clarity of the video within that shape. It's measured in pixels, and 1080px by 1920px is the standard for crisp, high-definition vertical video.
So, one defines the shape (the blueprint), and the other defines how sharp it looks (the materials).
Can I Post a 4:5 Video on TikTok or Reels?
Technically, yes, you can upload it. But you really, really shouldn't.
When you post a shorter 4:5 video to a platform built for 9:16, the app doesn't stretch your content. Instead, it adds black bars to the top and bottom to fill the empty space. This is often called "letterboxing."
That immediately signals that the video wasn't made for the platform. It kills the immersive, full-screen vibe that makes Reels and TikTok so engaging, and frankly, it just looks unprofessional. Always aim to edit your content to the native 9:16 aspect ratio for the best results.
Why Are Video Safe Zones So Important?
Safe zones are non-negotiable. They are the areas of your screen guaranteed to be free from any of the platform’s interface elements.
Think about it: every app plasters its own buttons, text, and icons all over your video. You’ve got the username, the caption, the like and share buttons, the sound title—it’s a lot.
If you place a crucial visual or your main call-to-action outside the safe zone, it will get covered up. Imagine your discount code hidden behind the "Follow" button. Your message is lost, and your video's impact plummets. Sticking to the safe zones ensures your audience can actually see what matters most.
With Postiz, you can schedule all your perfectly formatted vertical videos across every platform from one place. Stop wasting time uploading content one by one and start streamlining your entire social media strategy. Sign up for Postiz today and take control of your content calendar.

Founder of Postiz, on a mission to increase revenue for ambitious entrepreneurs
Do you want to grow your social media faster?

Do You Want to Grow Your Social Media Faster?
Thousands of creators and businesses use Postiz to 10x their social media reach. Stop spending hours — automate and grow.
🚀Schedule to all platforms at once
🤖Let AI write your posts for you
📈Watch your engagement skyrocket
💸Completely free to start
Related Posts

Learn how to measure social media success with proven strategies that track key metrics and drive real business growth. Discover how now!

Learn whether you can watch Instagram Stories anonymously, the risks of third-party viewers, and why no method is truly safe or private on Instagram.

Learn the best way of sharing reels to story to maximize your reach. This guide offers actionable tips to turn simple shares into powerful engagement drivers.
Ready to get started?
Grow your social media presence with Postiz.
Schedule, analyze, and engage with your audience.

Open-source social media scheduling tool